all images ©2017 brian burke photography
unauthorized use strictly prohibited

Thursday, October 30, 2008

Chicago Skyline

The obligatory skyline shot from our recent trip to Chicago. Click on the image for larger view.


I really wanted to get down here with a tripod and do a bona fide 5 or 6 frame panoramic. I didn't even put the head on my tripod the entire time we were there. I guess I lucked out on the clouds--the rain was just moving in from the west so I had some good clouds to mess with. We had a few minutes before our bus was set to leave, so I just capped off my 18-135mm walk-around lens with a circular polarizer and headed down to the water.

More Tanyard

I've been wanting to do a black and white study of the rock at the top of the waterfall at the Tanyard Creek nature trail. I took several different shots with a couple of different lenses, but I could never really get comfortable with a composition. (Oh yeah. That "stop sign" at the overlook station at the top of the trail? Ignore that. I do.) The rocks are really pretty cool, and it's one of the few times when you'd like a little more daylight to promote some natural contrast. But the sun was just coming up and the fog beginning to lift, so there wasn't really enough contrast.

So I piddlied a little bit and then took this shot, looking down at the rocks. I don't shoot enough shots with my Sigma 10-20mm lens--it's a fantastic piece of glass. This shot is at 10mm (15mm on a full-frame camera), and that's freaky wide; I kept having to move my feet out of the bottom of the shot. I love the exposure on this shot--other than a levels adjustment layer, there's nothing else done to this shot. I may need to punch up the rocks a little just to make them pop a little bit. If you've been out there, you know there's a pretty good elevation change from the foreground to the background that's not really conveyed in the photograph.

But Julie likes it. That's gotta count for something.


EXIF is a little goofy. Out of the camera, it's ISO 400, f11 for 1/20th of a second, and -2/3 EV. A lot of times I'll set the white balance for cloudy and then dial in -0.3 to -.07 exposure compensation to make up for my camera's meter, which tends to try to save the highlights. I shot this in RAW and then added back in about 1/3 of a stop of the the exposure compensation back in. So, there's a little negative EV in here, but not much. I think it helps keep the fog in play.

Wednesday, October 29, 2008

Tanyard Creek Waterfall in the fog

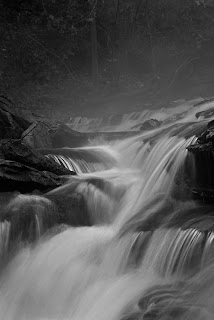
Saturday morning was foggy. I woke up early, and thought about heading over to the White River. After getting to Lee Town Road in Pea Ridge and realizing I would lose the light before I got there, I turned around and took a leisurely drive back through Price Coffee and Ford Springs Roads, and went to the Tanyard Creek nature trail. I ignore the signs and actually get out into the falls. There was a fair amount of fog shifting around, and I took a lot of shots, experimenting with differing ISO settings and shutter speed settings. I used what Bryan Peterson would call a "who cares" aperture of f11, and ultimately settled on this version. Too slow of a shutter speed tended to lose the detail in the foreground water; too fast tended to lose the silky effect. One thing to note is that your shutter speed will vary the effect across the depth of field. In other words, a slow shutter speed will blur foreground motion more than something further back in the frame, at least with running water.

I don't have a good neutral density filter. But I do have a good circular polarizer, so I popped that baby on and used it to help me extend the shutter speed without burning out the exposure. It was pretty dark, though, and I probably could have done without it. Get out and shoot.

EXIF info: Nikon D80 + 18-135 @80mm, ISO 100, f11, .40 sec

UPDATE: Here's a second
picture from the same shoot:


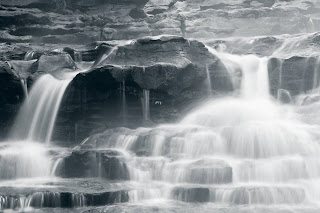
EXIF data: Same camera and lens, at 75mm, f11 for 1 second.


The first shot is converted to black and white using channel mixer. The second was converted using a gradient map adjustment layer over a levels adjustment layer, and then adjusting the individual red, blue and green historgrams in the levels layer. If you don't have the full version of Photoshop or don't have a channel mixer plug-in, this second method is a great way to exercise a lot of control over black and white conversions.