But, thanks to a friend of ours who is a flower vendor, we have a bunch of flowers around the house, and so I decided to try my hand at off-camera lighting and black backgrounds. The setup is simple. I stuck the stem in Hadley's candy bowl (which is actually a champagne bucket) and set it on the corner of our kitchen table nearest the window (about 3 feet away). Then, I taped a piece of black posterboard on the window behind the flower. To camera right about 90 degrees is a Nikon SB-28 at 1/2 power fired into a reflective umbrella. To camera left at about 50-60 degrees is a Nikon SB-80DX at 1/16th power through a Stofen Omnibounce. The flashes are triggered by Cybersync radio triggers. I started at 1/200" and chimped until I got the light the way I wanted it. Exposure ended up being ISO 100, f/8 for 1/200" (lens was 70-300VR at 185mm). I shot a lot of trial shots before getting out the tripod. This is not the sharpest of the bunch, but I dig the lighting.
Saturday, January 31, 2009
Silver Linings
It has been a slow-motion week this week. We had a week of school being out due to snow and ice. I had a two-day trial (and the prep that goes with it), so I was not able to get out and shoot in the snow at places like Tanyard Creek and Ann Falls. 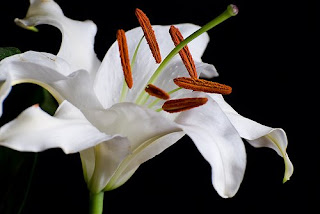 But, thanks to a friend of ours who is a flower vendor, we have a bunch of flowers around the house, and so I decided to try my hand at off-camera lighting and black backgrounds. The setup is simple. I stuck the stem in Hadley's candy bowl (which is actually a champagne bucket) and set it on the corner of our kitchen table nearest the window (about 3 feet away). Then, I taped a piece of black posterboard on the window behind the flower. To camera right about 90 degrees is a Nikon SB-28 at 1/2 power fired into a reflective umbrella. To camera left at about 50-60 degrees is a Nikon SB-80DX at 1/16th power through a Stofen Omnibounce. The flashes are triggered by Cybersync radio triggers. I started at 1/200" and chimped until I got the light the way I wanted it. Exposure ended up being ISO 100, f/8 for 1/200" (lens was 70-300VR at 185mm). I shot a lot of trial shots before getting out the tripod. This is not the sharpest of the bunch, but I dig the lighting.
But, thanks to a friend of ours who is a flower vendor, we have a bunch of flowers around the house, and so I decided to try my hand at off-camera lighting and black backgrounds. The setup is simple. I stuck the stem in Hadley's candy bowl (which is actually a champagne bucket) and set it on the corner of our kitchen table nearest the window (about 3 feet away). Then, I taped a piece of black posterboard on the window behind the flower. To camera right about 90 degrees is a Nikon SB-28 at 1/2 power fired into a reflective umbrella. To camera left at about 50-60 degrees is a Nikon SB-80DX at 1/16th power through a Stofen Omnibounce. The flashes are triggered by Cybersync radio triggers. I started at 1/200" and chimped until I got the light the way I wanted it. Exposure ended up being ISO 100, f/8 for 1/200" (lens was 70-300VR at 185mm). I shot a lot of trial shots before getting out the tripod. This is not the sharpest of the bunch, but I dig the lighting.Thursday, January 22, 2009
Train Tracks
As I typed the title of this post, it occurred to me that moving from the comfort of Photoshop Elements 5 to Lightroom 2.2 has been a bit like being hit by a train. You know, I was driving along, pretty happy with my post-processing skills and black/white conversions, and then BAM, I got hit by the Lightroom Express. Not in a bad way, though. LR has been a bit overwhelming for me, partly because I have endeavored to work on cataloging and organizing a few thousand photographs as part of the migration. For someone who is not particularly well organized, well, that's a bit of a chore. LR is at once complicated (because it does SO much) and easy (because it does SO much). That said, I had my PSE workflow pretty much down, knew a bunch of tricks and shortcuts, and now I'm learning something totally different. So, yeah--train wreck.
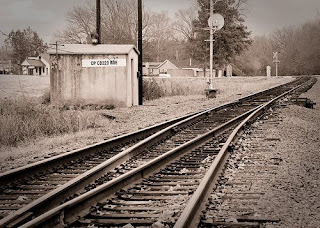 I've been reading the books I ordered to learn as much as I can. I've shot a little bit in the past couple of weeks (not much, but a little), and I've been itching to get out of LR's Library module and dig into the Develop module. Here's a picture that I've taken basically from start to finish through the Develop module. I set the white balance using the White Balance Selection tool, adjusted the Exposure and Recovery sliders, adjusted the midtone contrast with the Clarity slider and then adjusted the total contrast with the Tone Curve. The Targeted Adjustment Tool is an amazing tool for making localized adjustments, particularly with the Tone Curve (much like a Curves adjustment layer in Photoshop).
The black and white conversion is most cool. I first used the greyscale conversion (which I never used in PSE), made more adjustments to the Exposure, Blacks and Clarity sliders, and then used the Targeted Adjustment Tool tool to adjust the greyscale mix (which consists of red, orange, yellow, green, aqua, blue, purple and magenta). Then I applied a duotone. Straightened, cropped, post-crop vignette, and that's it. Then, I downloaded a plug-in that exports photos directly to Flickr, so it gets exported to my Flickr page.
This was taken on the train tracks in Julie's home town of Roe, Arkansas (population 124--salute!) on December 27, 2008. I got lots of stares. That's ok. I've been wanting to take this photograph for a long time. Personally, I'm very close to liking the b/w conversion. And I'm very close to absolutely loving Lightroom.
EXIF:
Nikon D80 with 18-135mm lens at 75 mm
ISO 400
f/11
1/160 sec.
UPDATE: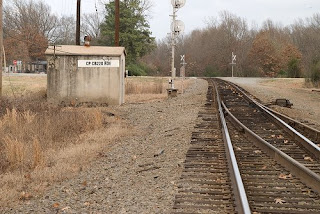
Here's a couple of other shots from the same session. This one is from the left side of the tracks (I like the right side better).
This one was kinda down low with a contemporary tilt of the camera.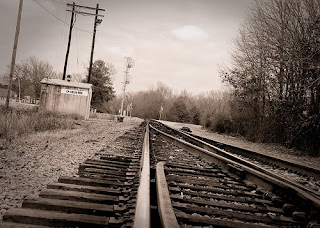
 I've been reading the books I ordered to learn as much as I can. I've shot a little bit in the past couple of weeks (not much, but a little), and I've been itching to get out of LR's Library module and dig into the Develop module. Here's a picture that I've taken basically from start to finish through the Develop module. I set the white balance using the White Balance Selection tool, adjusted the Exposure and Recovery sliders, adjusted the midtone contrast with the Clarity slider and then adjusted the total contrast with the Tone Curve. The Targeted Adjustment Tool is an amazing tool for making localized adjustments, particularly with the Tone Curve (much like a Curves adjustment layer in Photoshop).
The black and white conversion is most cool. I first used the greyscale conversion (which I never used in PSE), made more adjustments to the Exposure, Blacks and Clarity sliders, and then used the Targeted Adjustment Tool tool to adjust the greyscale mix (which consists of red, orange, yellow, green, aqua, blue, purple and magenta). Then I applied a duotone. Straightened, cropped, post-crop vignette, and that's it. Then, I downloaded a plug-in that exports photos directly to Flickr, so it gets exported to my Flickr page.
This was taken on the train tracks in Julie's home town of Roe, Arkansas (population 124--salute!) on December 27, 2008. I got lots of stares. That's ok. I've been wanting to take this photograph for a long time. Personally, I'm very close to liking the b/w conversion. And I'm very close to absolutely loving Lightroom.
EXIF:
Nikon D80 with 18-135mm lens at 75 mm
ISO 400
f/11
1/160 sec.
UPDATE:

Here's a couple of other shots from the same session. This one is from the left side of the tracks (I like the right side better).
This one was kinda down low with a contemporary tilt of the camera.

Monday, January 5, 2009
Migration
I have made the decision to migrate all of my digital images to Adobe Photoshop Lightroom (which I also intend to use as my primary editor). At first, the image library may only consists of things I'm actually working on (as opposed to every single shot of Christmas and birthdays and school events, etc.), but ultimately I want to get every picture I take or have taken into Lightroom to catalog and apply metadata/tags so that it's very searchable.
When I ordered LR, I also ordered Scott Kelby's book, Lightroom 2.0 Book for Digital Photographers and The Adobe Photoshop Lightroom 2 Book: The Complete Guide for Photographers by Martin Evening. I cracked Kelby's book last night, and the first chapter is about importing your images into LR and how to name them and apply metadata. He urges you to do this before you ever edit an image in LR. I can't really wait to learn the imaging tools, so I may not wait that long, but I'm now in the position to organize everything I have, including those film pictures that Wal-Mart would put on CD for me back when I was shooting film.
The problem is selecting a naming convention. I think I'm going to organize by year shot, then by month shot, and then by file number. So, a picture shot on January 3, 2009, would be filed in the January folder under the 2009 folder, and the file name would look something like 2009-01-03_DCIMxxxx (where xxxx represents the actual number of the picture). I'll then add metadata or tags so that they are searchable. I'm really struggling with this. I tend to organize by event (e.g., All That Dance->2008>Recital) or in the case of the few portrait shoots I do, by family (e.g., Parks Family->Fall 2008), and then the file numbers just retain their original names. Some of you (like Mendy) are far more organized than I am and have probably already either tackled this problem, or don't have to worry about it because you devised a file-naming convention right out of the gate.
So help me out. How do you organize your piles of digital images?
Subscribe to:
Posts (Atom)